Concave Edges of Blocks for Fun Movement
If you have a great piece of paper to use as a background and then you cover it up with a bunch of photos, you can trim your journaling block to reveal more of the paper behind.
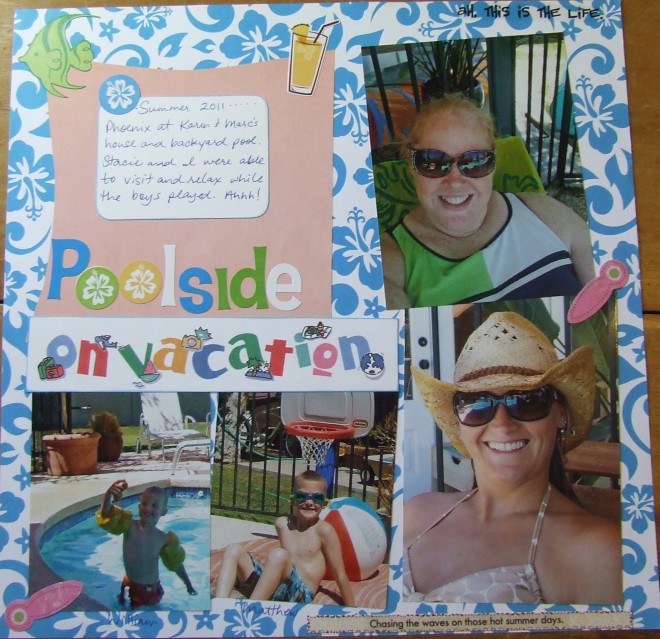
On this “Poolside On Vacation” layout, I covered up much of the background paper with photos and my title and then it was time to make the journaling block fit. I had plenty of space to put the journaling on the page, but that little white block would be lost against the busy, tropical background paper. So I wanted to add a square of that peach colored paper.
When I added the peach block, it solved my issue of seeing the journaling block, but then I felt that the peach block covered up too much of the background. So I decided to trim the edges of the peach block.
I made the edges concave slightly. In fact the result is quite subtle, but if you look closely the upper corners of that peach block seem to be outstretched at the corners. This is achieved with those concaved edges.
I did this by finding the center of the edge and measuring in approximately ½ inch and putting a small mark on the backside of the paper. Then, using scissors, I carefully cut a curving line from the corner around the small 1/2-inch mark and to the adjacent corner. Basically I removed a section of the edge while leaving the corners in their original position.
The effect of the concaved edges seems to not only reveal more of the background paper, but it lends itself to a bit of visual “movement” on that peach block. It’s as though the corners are bouncing into place as my eye looks at the pictures in a clockwise fashion and then to the upper right corner where the drink sticker is and then to the upper left corner with the fish sticker.
It’s a fun and easy embellishment that enhances a page highlighting a fun time in the sun at the pool. How cool!
.
Categorized as: Embellishments | Journaling | Printed Paper

